Building an Android App with Flutter and Enabling App Launch from https:// URLs Using AppLinks
2021-12-26 22:14 (4 years ago)
ytyng

Android's AppLinks is a feature that launches an app when transitioning to an https:// URL in Android's Chrome, provided the URL matches a specified pattern. Unlike traditional Deep Links, AppLinks uses app signatures to determine the app, allowing you to securely pass information only to specific apps that are controlled within the domain.
This blog post will guide you through enabling this feature.
% flutter doctor
Doctor summary (to see all details, run flutter doctor -v):
[✓] Flutter (Channel stable, 2.8.1, on macOS 12.0.1 21A559 darwin-arm, locale ja-JP)
[✓] Android toolchain - develop for Android devices (Android SDK version 32.0.0)
[✓] Xcode - develop for iOS and macOS (Xcode 13.1)
[✓] Chrome - develop for the web
[✓] Android Studio (version 2020.3)
[✓] IntelliJ IDEA Ultimate Edition (version 2021.3)
[✓] VS Code (version 1.62.3)
[✓] Connected device (2 available)
(Note: The editor used here is Android Studio, not VS Code)
Creating a New App
In Android Studio: File menu → New → New Flutter Project
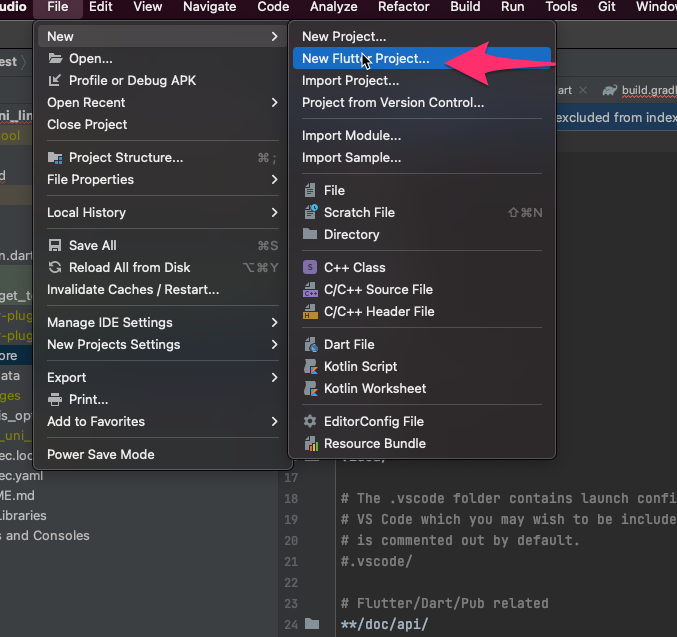
Flutter → Next
Project name: my_link_app (you can choose any name)
Organization: com.ytyng (you can choose any name)
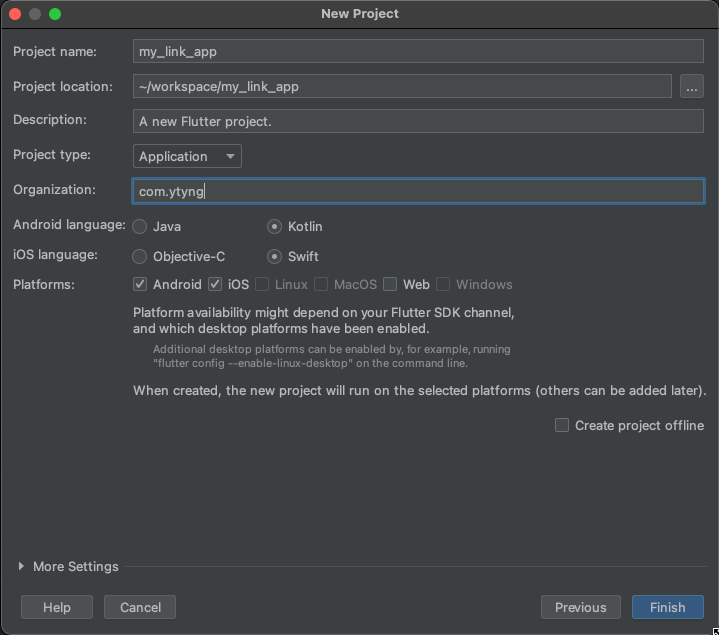
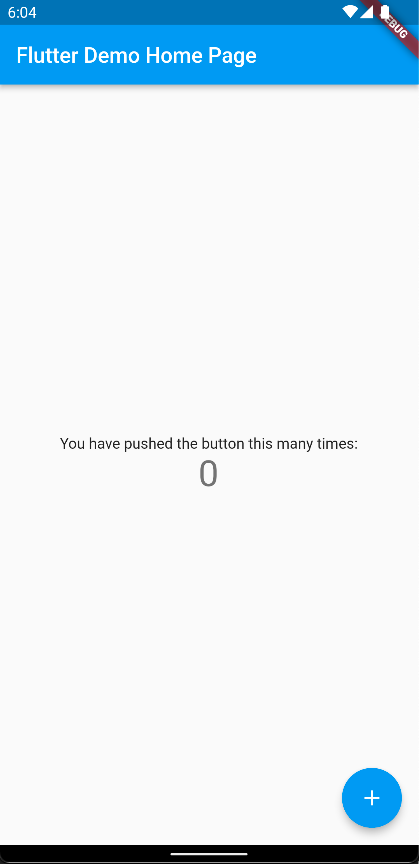
Run the app once to see the demo counter app launch.
Creating a Keystore
Reference: https://developer.android.com/studio/publish/app-signing?hl=en
Open the android directory in Android Studio by selecting File -> Open...
Create a keystore. If you already have a keystore, you can skip this step.
Select Build menu -> Generate Signed Bundle / APK...
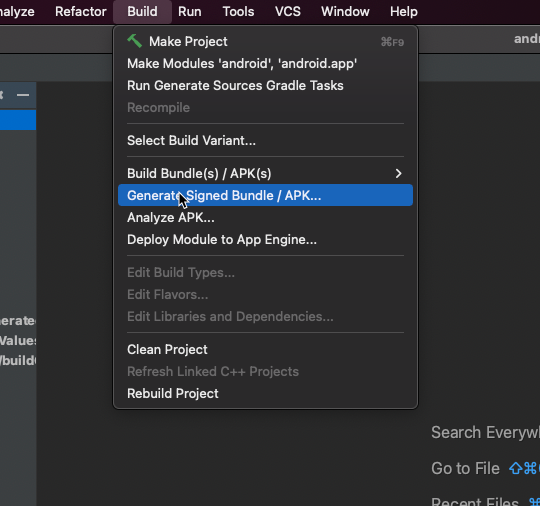
Select APK and then Next (Android App Bundle is also fine)
Click Create new... under Key store path
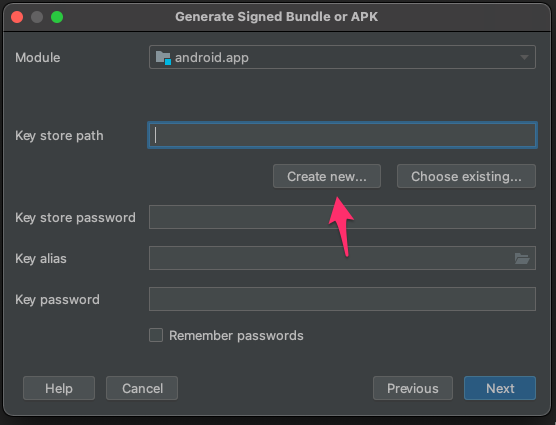
Specify a key store path. For this example, we created keystore.jks under the android folder. Fill in the password and other fields.
After creating the keystore, click Next
In the Build Variants settings, select debug, profile, and release while holding Shift, then click Finish.
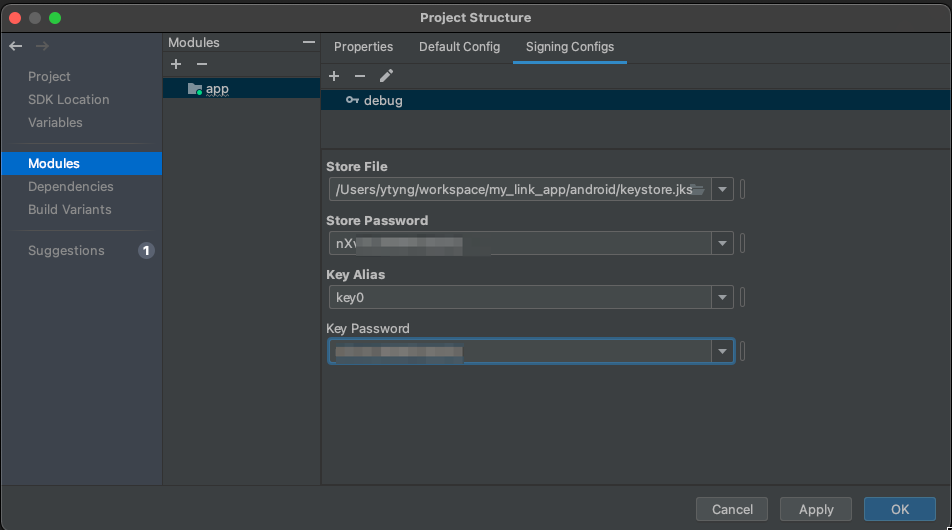
In Android Studio, open the File -> Project Structure
Under Modules, go to Signing Config and fill in the details for the debug configuration. Use the keystore file created earlier, the key alias (key0), and the password. Close with OK.

In Project Structure, under Modules -> Default Config, add the debug signing configuration.
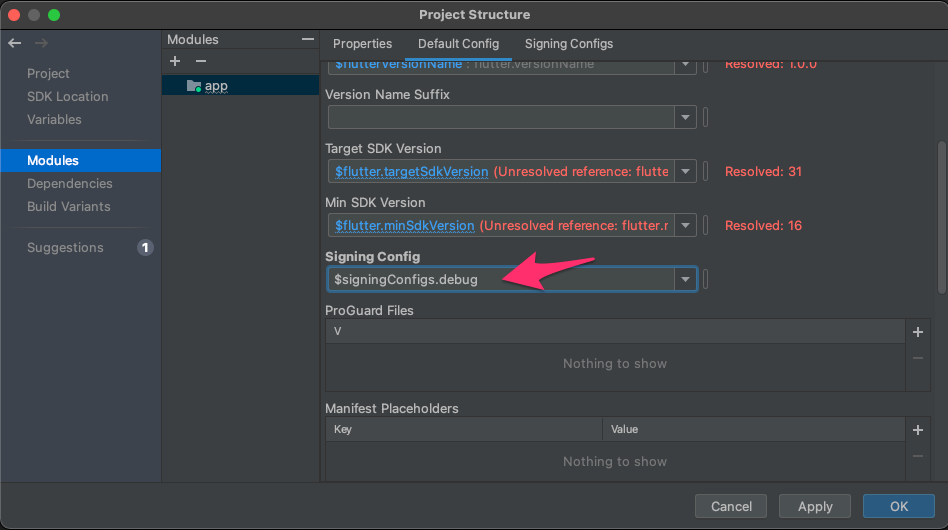
In Project Structure, add the debug signing configuration to each build variant in Build Variants.
Stop and re-run the app in the emulator. If the app fails to launch, you may encounter this error:
FAILURE: Build failed with an exception.

* What went wrong:
Execution failed for task ':app:packageDebug'.
> A failure occurred while executing com.android.build.gradle.tasks.PackageAndroidArtifact$IncrementalSplitterRunnable
   > Entry name 'assets/flutter_assets/AssetManifest.json' collided

* Try:
Run with --stacktrace option to get the stack trace. Run with --info or --debug option to get more log output. Run with --scan to get full insights.

* Get more help at https://help.gradle.org

BUILD FAILED in 11s
Exception: Gradle task assembleDebug failed with exit code 1
This error occurs because the signature has changed, preventing reinstallation. Uninstall the app from the emulator and try running it again.
Verifying the Signature
Verify the fingerprint of the keystore you created.
% keytool -J-Duser.language=en -list -v -keystore android/keystore.jks
Enter keystore password:
Keystore type: PKCS12
Keystore provider: SUN

Your keystore contains 1 entry

Alias name: key0
Creation date: Dec 26, 2021
Entry type: PrivateKeyEntry
Certificate chain length: 1
Certificate[1]:
Owner: O=ytyng
Issuer: O=ytyng
Serial number: 4b0bf92f
Valid from: Sun Dec 26 21:16:44 JST 2021 until: Thu Dec 20 21:16:44 JST 2046
Certificate fingerprints:
    SHA1: 9D:CB:5B:FC:DE:30:94:5B:8B:AC:AC:B3:89:69:CE:3C:E8:6C:5A:2A
    SHA256: B3:A2:05:04:F6:75:A7:27:A3:77:96:E2:E1:CF:1B:9A:4B:90:3D:25:E6:67:D0:78:A5:C9:72:1C:D8:93:77:52
Signature algorithm name: SHA256withRSA
Subject Public Key Algorithm: 2048-bit RSA key
If the output is in Japanese, you may encounter issues with the SHA256 section. Use -J-Duser.language=en to force English output.
Note down the SHA256 fingerprint.
Also, verify the signature of the app installed in the Android emulator.
% keytool -J-Duser.language=en -list -printcert -jarfile build/app/outputs/flutter-apk/app-debug.apk
Signer #1:

Signature:

Owner: O=ytyng
Issuer: O=ytyng
Serial number: 4b0bf92f
Valid from: Sun Dec 26 21:16:44 JST 2021 until: Thu Dec 20 21:16:44 JST 2046
Certificate fingerprints:
    SHA1: 9D:CB:5B:FC:DE:30:94:5B:8B:AC:AC:B3:89:69:CE:3C:E8:6C:5A:2A
    SHA256: B3:A2:05:04:F6:75:A7:27:A3:77:96:E2:E1:CF:1B:9A:4B:90:3D:25:E6:67:D0:78:A5:C9:72:1C:D8:93:77:52
Signature algorithm name: SHA256withRSA
Subject Public Key Algorithm: 2048-bit RSA key
Version: 3

Extensions:
Since the signatures match, you can confirm that the app is signed with the keystore created earlier.
Writing the Intent Filter
References:
https://developer.android.com/studio/write/app-link-indexing?hl=en
https://qiita.com/noboru_i/items/fd4634ecb326b3749ac0
Open android/app/src/main/AndroidManifest.xml and add the following <intent-filter> inside the activity tag.
<intent-filter android:autoVerify="true">
 <action android:name="android.intent.action.VIEW"/>

 <category android:name="android.intent.category.DEFAULT"/>
 <category android:name="android.intent.category.BROWSABLE"/>

 <data
 android:host="www.ytyng.com"
 android:pathPrefix="/my-app-link"
 android:scheme="https"/>
</intent-filter>
In this example, the app will launch when https://www.ytyng.com/my-app-link/xxxx is specified.
Setting the Minimum API Level
After setting the above intent filter, if you open AndroidManifest.xml in Android Studio, you may see a warning for the autoVerify="true" attribute indicating "API level 23 and higher (current min is 16)".
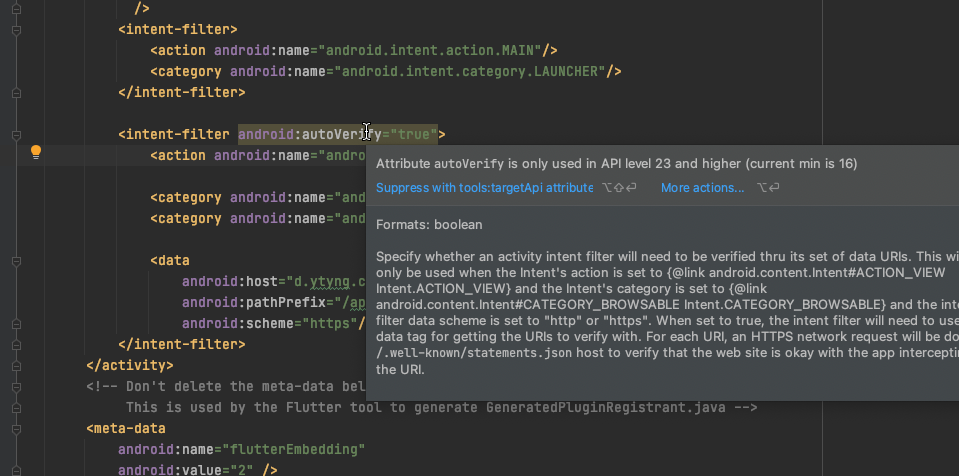
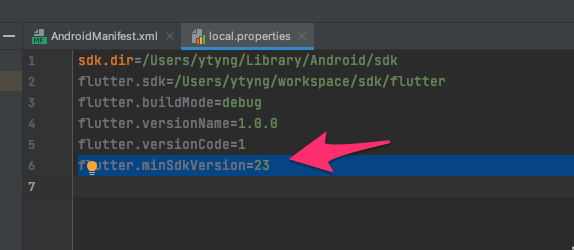
To set the Min API Level, open local.properties in the android directory and add:
flutter.minSdkVersion=23
Introducing uni_links
Install the uni_links package from Pub.
https://pub.dev/packages/uni_links
Add the following line to the dependencies section of pubspeck.yaml:
uni_links: ^0.5.1
Run Pub get to fetch the package.
Modifying the Widget
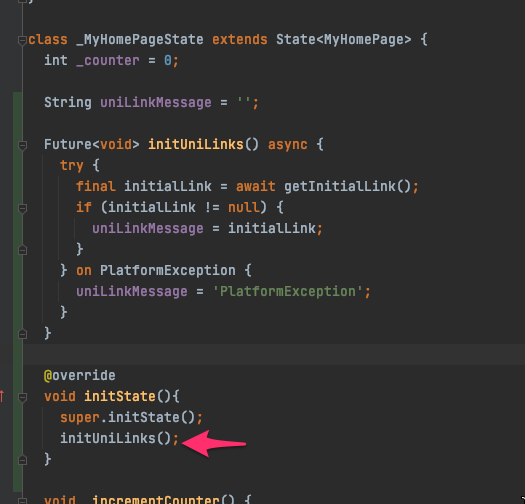
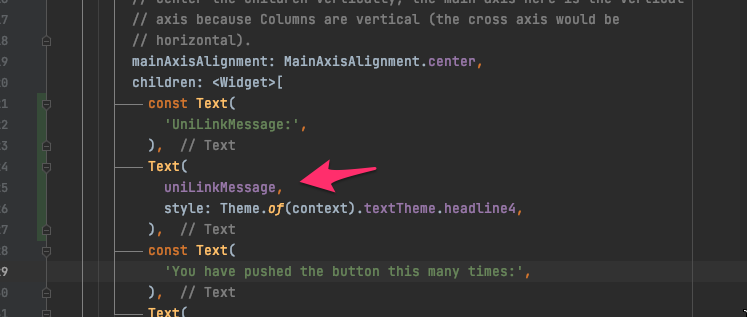
For verification, display the launch URL in the app.
Modify main.dart in the demo app to display the result of getInitialLink() from the uni_links package, as shown on the pub page.
This completes the app-side setup.
Server-Side Configuration
On the server, place the following content in /.well-known/assetlinks.json.
[
  {
    "relation": ["delegate_permission/common.handle_all_urls"],
    "target": {
      "namespace": "android_app",
      "package_name": "com.ytyng.my_link_app",
      "sha256_cert_fingerprints":
      ["B3:A2:05:04:F6:75:A7:27:A3:77:96:E2:E1:CF:1B:9A:4B:90:3D:25:E6:67:D0:78:A5:C9:72:1C:D8:93:77:52"]
    }
  }
]
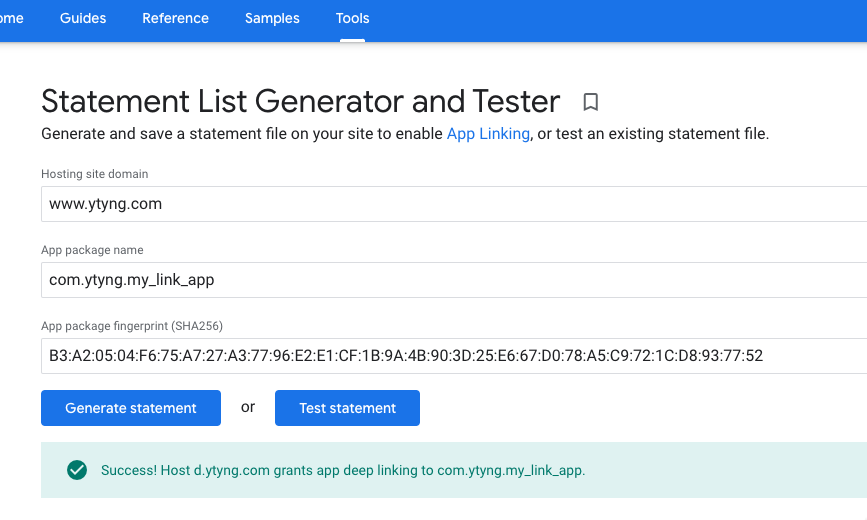
Ensure the sha256_cert_fingerprints matches the signature verified earlier using keytool.
After deploying assetlinks.json, verify it using this tool:
https://developers.google.com/digital-asset-links/tools/generator?hl=en
For verification, deploy a page with a link to launch the App Link.
<a href="https://www.ytyng.com/auth?token=xxxxxx">Login with app</a>
Create a link like the one above and display the page in Android's Chrome browser.
Ensure the app is closed.
Click the link to verify that the app launches.
We look forward to discussing your development needs.